Part I - Setup
Part I: Create your GitHub Pages site
Step 1: Create a new GitHub repository
Create a new GitHub repository. This will normally leave you with a main branch. Rename this to master and clone it to your computer (or keep it, but then replace all the master instructions below with main).
Alternatively, if you want to add the site to an existing repository, it recommended to host the source files on a separate empty, unrelated branch, a so-called orphan branch. We might call it site-sources:
git checkout --orphan site-sources
git rm -rf .
If you choose to go this way, please replace all the commands in this tutorial running on the master branch with the site-sources branch (or whatever you called it).
Step 2: Create a folder for your sources
Navigate to your local repository (you’re in the master branch) and create the /docs folder.
cd /path/to/your/repository
mkdir docs
cd docs
Step 3: Create a new Jekyll site
We will use the created folder as publishing source and create a new Jekyll site there.
jekyll new --skip-bundle .
Open the gemfile that Jekyll created and add “#” to the beginning of the line that starts with gem "jekyll" to comment out this line. Then add the github-pages gem by editing the line starting with # gem "github-pages". Change this line to:
gem "github-pages", "~> GITHUB-PAGES-VERSION", group: :jekyll_plugins
Replace GITHUB-PAGES-VERSION with the latest supported version of the github-pages gem. You can find this version here: “Dependency versions.”
Save and close the gemfile and run bundle install.
As your GitHub Page will be hosted in a subdirectory (e.g. for this specific site: ulricusr.github.io/multilingual-github-pages/), you need to add the baseurl to the Jekyll _config.yml file in your /docs directory: baseurl: <your repository name>.
You can optionally preview your site on http://localhost:4000/multilingual-github-pages after having run bundle exec jekyll serve.
Finally build your site using bundle exec jekyll build. This will create a _site folder, which should already be listed in your .gitignore file. If not, do so.
Step 4: Commit your sources to your GitHub repository
To do so, move to the root directory of your local git repository, add and commit the newly created files (including the /docs folder and ignoring the /docs/_site folder), and push everything to your remote repository on GitHub.
cd ..
git add -A
git commit -m "Initial commit"
git push
Your source files should now be in your GitHub repository. It’s time to take care of the generated site files.
Step 5: Create a new local repository for your site files
Navigate to your /docs/_site folder and initialize a new repository with the same remote as above.
cd docs/_site/
git init .
git remote add origin https://github.com/<your-username>/<your-repo-name>
As we want our files to be pushed to a separate branch site, we need to create this branch using git branch site.
Step 6: Prepare your site files and push them to your remote repository
Before we push our site files, we need to create one new, empty file named .nojekyll. It makes sure that GitHub Pages does not process the site files, but deploys them as they come.
touch .nojekyll
Now add, commit and push all site files to your remote repository. As the branch does not exist yet remotely, we need to set the upstream, using the -u option.
git add -A
git commit -m "Initial commit"
git push -u origin site
Your site files should now reside in the site branch in your GitHub repository.
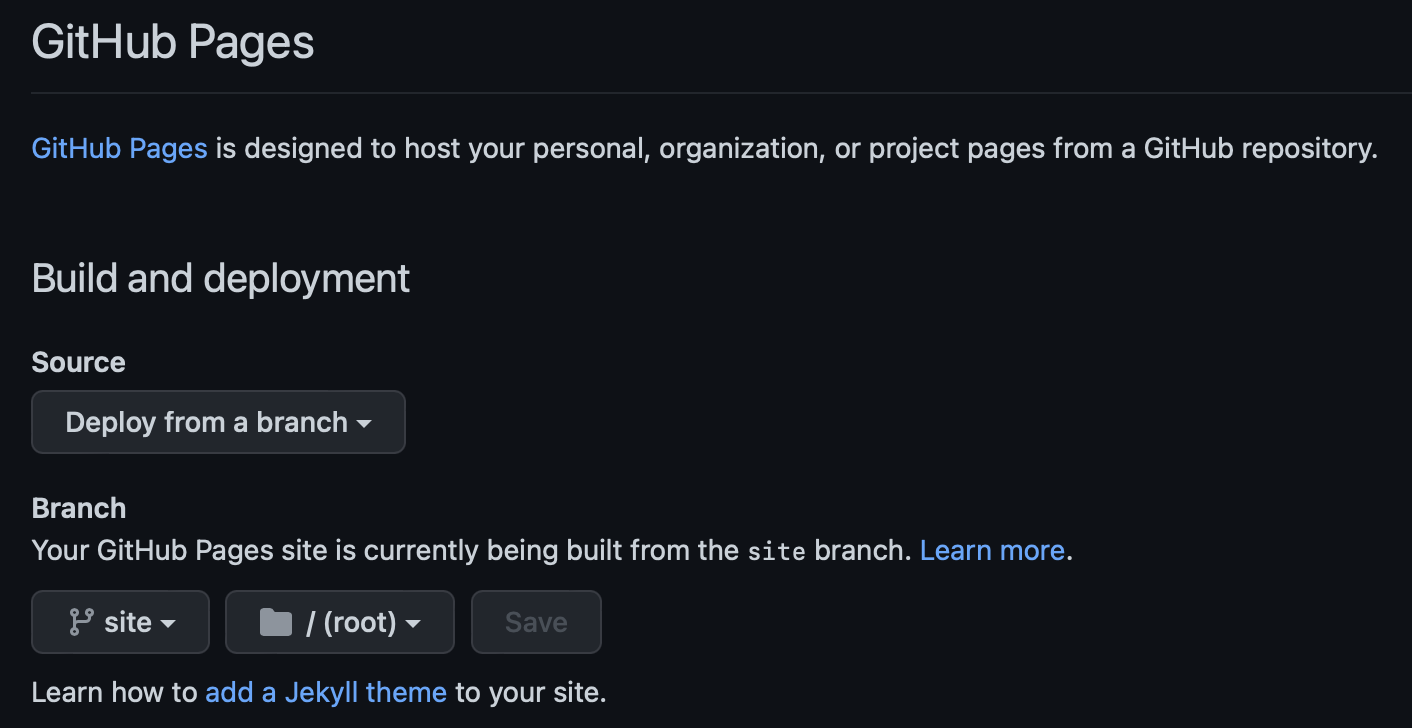
Step 7: Configure GitHub to the right publishing source
The final step is to configure GitHub Pages to deploy your site. Go to the settings of your repository, choose Pages from the menu, and set the build and deployment source to Deploy from a branch, then select your site branch and keep the /(root) folder. Hit save, wait a minute or so (you can always check the deployment progress in the “Actions” tab of your repository), and then check your online site by hitting the “Visit site” button.